Bringing your classic Ford 8N tractor back to life? Its electrical system, often a tangled mess of wires, can seem daunting. But with patience and this guide, you'll have it sparking back to life. We'll cover understanding your wiring schematic, troubleshooting common issues, and safely restoring your tractor's electrical system. Consider this your step-by-step roadmap. For added power, consider a front loader.
Understanding Your 8N Ford Tractor Wiring Schematic
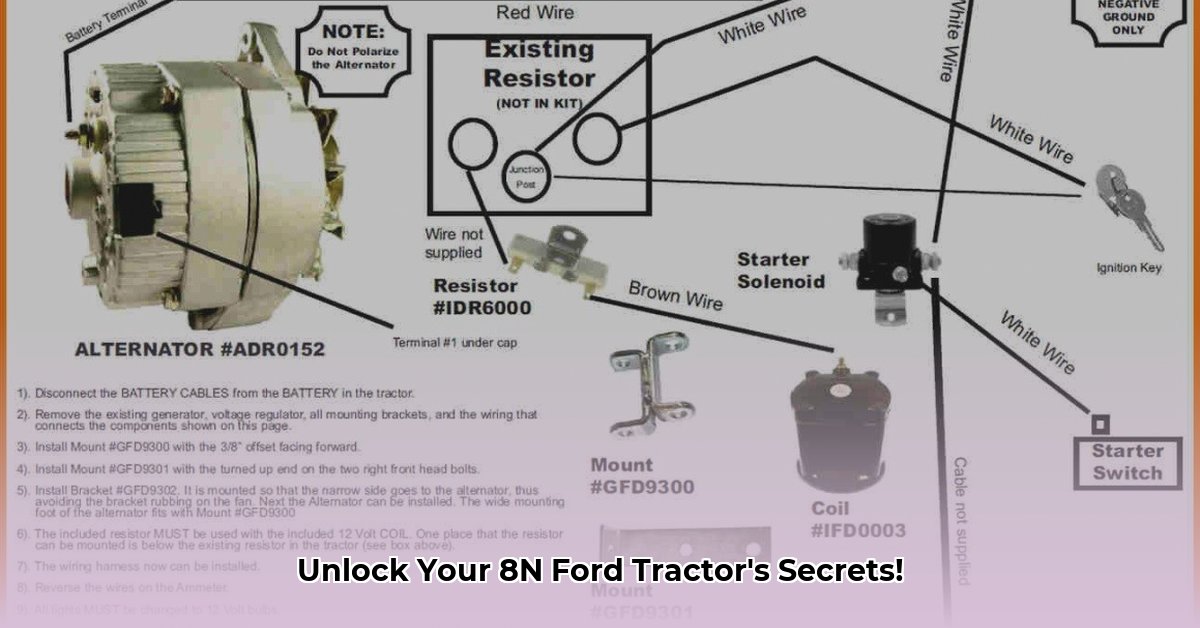
Before touching any wires, obtain a wiring diagram – your 8N's electrical system map. It shows every wire, switch, and connection, acting as an electrician's blueprint. However, diagrams vary slightly by year and model, so finding the correct one is crucial.
Online forums dedicated to classic Ford tractors are excellent resources. Reproduction manuals are often clearer than faded originals. Investing in a good reproduction manual is often worthwhile for clarity and detailed information. Have you considered the time savings alone?
Common Electrical Problems and Solutions
Most 8N electrical problems stem from simple issues: corrosion, worn insulation, or loose connections. Before complex repairs, inspect every connection. Clean corroded areas and tighten loose terminals.
Symptom: Lights are out. Possible Causes: Blown fuse, faulty switch, corroded wiring. Solutions: Check fuses first; if okay, examine switches and wiring for breaks using a multimeter or test light. Isn't that a simple first step?
Symptom: Starter motor won't crank. Possible Causes: Low battery, malfunctioning starter solenoid ("clicker"), wiring break. Solutions: Check battery voltage; trace wires from battery to starter, checking for damage, corrosion, or loose connections. Test the solenoid using a test light or multimeter. Does this sound familiar?
Restoring Your 8N's Wiring: A Step-by-Step Guide
Safety First! Always disconnect the battery's negative terminal before electrical work to prevent shocks or short circuits. This is non-negotiable.
Inspection: Thoroughly examine the wiring harness for broken wires, frayed insulation, and corroded connections. Take pictures to help later.
Cleaning: Clean every connection with a wire brush and electrical contact cleaner to remove corrosion and improve conductivity.
Replacement: Replace damaged wiring with automotive-grade wire of the correct gauge. Use correct connector ends. Using the correct parts is crucial for reliable performance and safety.
Testing: Before reconnecting the battery, use a multimeter to check continuity in each circuit to ensure correct wiring. This is a critical safety check.
Reassembly: Carefully reassemble the wiring, following your schematic. Take your time; accuracy is paramount.
Reconnection: Reconnect the battery's negative terminal.
Final Test: Thoroughly test all electrical systems. Remember your safety glasses and gloves.
Sourcing Replacement Parts
Finding parts for an 8N might require some searching. Online marketplaces specializing in classic tractor parts are helpful. Online communities offer advice and support. Local salvage yards might also be a source. Joining a Ford 8N restoration forum is advantageous; fellow enthusiasts often share information and part sources.
| Part Type | Sourcing Options | Important Notes |
|---|---|---|
| Wiring Harness | Online marketplaces, classic tractor parts suppliers | Ensure correct fit for your tractor's year. |
| Connectors | Online marketplaces, automotive electrical suppliers | Match original connectors for a clean look. |
| Switches | Online marketplaces, classic tractor parts suppliers, salvage yards | Test switches before installation. |
| Fuses | Auto parts stores, electrical suppliers | Use the correct amperage rating. |
This guide provides a framework. Consult a professional mechanic for complex problems. Patience, attention to detail, and safety are essential for success. Remember, restoring your 8N’s electrical system is a rewarding experience. But safety always comes first!